
Banyak dari kita yang kesulitan jika menjalankan atau berkenalan dengan OS baru. Misalkan jika kita lebih sering menggunakan OS windows dan ternyata ada program atau tugas yang mengharuskan menggunakan OS Linux, kita akan sedikit kesulitan. Mulai dari proses instalasi OS baru hingga command-command atau fungsi-fungsi untuk menjalankan perintah di lingkungan yang baru. berikut ini merupakan salah satu cara yang bisa kita lakukan jika kita ingin menggunakan linux tapi belum berkesempatan menginstall-nya di komputer kita. walaupun menginstall OS baru (Linux) tidak ada salahnya juga, sekalian untuk mencoba dan belajar OS yang satu ini.
saya akan menjelaskan sedikit, bagaimana menjalankan OS linux di Cloud menggunakan C9.io
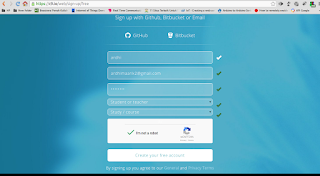
1. Buka alamat c9.io

2. lakukan SignUp


12. copy template codingan assembly

13. buat file dengan nama "Makefile" (seperti tahap ke 11)
14. copy isi dari makefile dari LMS

15. copy codingan (modul 2: stack) ke main.asm

18. tunjuk pointer ke label main
terlihat bahwa memori pada register esp berubah dari ...........e0 ke ..........dc. dalam hexa.
terlihat bahwa perubahannya sebesar 4 Byte (df, de, dd, dd)
1. Buka alamat c9.io

2. lakukan SignUp


3. Lakukan konfirmasi melalui email
4. setelah konfirmasi, lakukan login kembali menggunakan username dan password

5. Create a New Workspace


6. klik WorkSpace, tunggu hingga proses instalasi selesai


7. Linux siap digunakan
8. install package "yasm"
ardhi:~/workspace $ sudo apt-get install yasm
pesan keluaaran:
Reading package lists... Done
Building dependency tree
Reading state information... Done
The following NEW packages will be installed:
  yasm
0 upgraded, 1 newly installed, 0 to remove and 1 not upgraded.
Need to get 642 kB of archives.
After this operation, 1696 kB of additional disk space will be used.
Get:1 http://mirror.as24220.net/pub/ubuntu/ trusty/main yasm amd64 1.2.0-1ubuntu1 [642 kB]
Fetched 642 kB in 3s (204 kB/s)
Selecting previously unselected package yasm.
(Reading database ... 132562 files and directories currently installed.)
Preparing to unpack .../yasm_1.2.0-1ubuntu1_amd64.deb ...
Unpacking yasm (1.2.0-1ubuntu1) ...
Processing triggers for man-db (2.6.7.1-1ubuntu1) ...
Setting up yasm (1.2.0-1ubuntu1) ...
9. buat folderardhi:~/workspace $ mkdir orkomsiang
10. masuk ke folder orkomsiangardhi:~/workspace $ cd orkomsiang
11. buat file dengan nama "main.asm". letakan ke folder "orkomsiang"
12. copy template codingan assembly
;@author : Ardhi Maarik

section .data  ;data variable

section .bss  ;data reservation


section .text
 global main

main:

 ;exit
 mov eax, 1
 int 0x80

13. buat file dengan nama "Makefile" (seperti tahap ke 11)
14. copy isi dari makefile dari LMS
#
exe= main
src= main.asm
assembler= yasm

#
obj= $(patsubst %.asm,%.o,$(src))

default: main

.PHONY: main
main: $(obj)
 ld -o $(exe) -e main -m elf_i386 $(obj)

.PHONY: clean
clean:
 rm -f *.o *.lst $(exe) *~ .*.gdb

%.o: %.asm
 $(assembler) $*.asm -f elf32 -g dwarf2 -l $*.lst

15. copy codingan (modul 2: stack) ke main.asm
;@author : Ardhi Maarik

section .data  ;data variable

section .bss  ;data reservation


section .text
 global main

main:
 mov eax , 10h
 push eax
 mov ax, 01h
 push eax
 mov eax , 77h
 pop eax
 pop eax

 ;exit
 mov eax, 1
 int 0x80
16. lakukan compile terhadap program yang dibuat (tanpa "$")
$ make
keluaran:yasm main.asm -f elf32 -g dwarf2 -l main.lst
ld -o main -e main -m elf_i386 main.o
17. lakukan debuging (tanpa "$")$ gdb main
keluaranGNU gdb (Ubuntu 7.7.1-0ubuntu5~14.04.2) 7.7.1
Copyright (C) 2014 Free Software Foundation, Inc.
License GPLv3+: GNU GPL version 3 or later <http://gnu.org/licenses/gpl.html>
This is free software: you are free to change and redistribute it.
There is NO WARRANTY, to the extent permitted by law. Type "show copying"
and "show warranty" for details.
This GDB was configured as "x86_64-linux-gnu".
Type "show configuration" for configuration details.
For bug reporting instructions, please see:
<http://www.gnu.org/software/gdb/bugs/>.
Find the GDB manual and other documentation resources online at:
<http://www.gnu.org/software/gdb/documentation/>.
For help, type "help".
Type "apropos word" to search for commands related to "word"...
Reading symbols from main...done.
(gdb) Quit
(gdb)
18. tunjuk pointer ke label main
break mainkeluaran:
Breakpoint 1 at 0x8048060: file main.asm, line 12.19. jalankan proses debuging
runkeluaran:
Starting program: /home/ubuntu/workspace/orkomsiang/main

Breakpoint 1, main () at main.asm:12
12       mov eax , 10h
20. tampilkan nilai dari register "eax" dan "esp"
display $eax
1: $eax = 0
display $eps
2: $esp = (void *) 0xffffd1e021. jalankan tiap line program
ni
13       push eax
2: $esp = (void *) 0xffffd1e0
1: $eax = 16
masukan nilai 16 ke register eax
14       mov ax, 01h
2: $esp = (void *) 0xffffd1dc
1: $eax = 16
push nilai pada register eax ke stack.
terlihat bahwa memori pada register esp berubah dari ...........e0 ke ..........dc. dalam hexa.
terlihat bahwa perubahannya sebesar 4 Byte (df, de, dd, dd)
15       push eax
2: $esp = (void *) 0xffffd1dc
1: $eax = 1
16       mov eax , 77h
2: $esp = (void *) 0xffffd1d8
1: $eax = 1
17       pop eax
2: $esp = (void *) 0xffffd1d8
1: $eax = 119
18       pop eax
2: $esp = (void *) 0xffffd1dc
1: $eax = 1
21       mov eax, 1
2: $esp = (void *) 0xffffd1e0
1: $eax = 16
22       int 0x802: $esp = (void *) 0xffffd1e0
1: $eax = 1
~SEKIAN~
No comments:
Post a Comment